Ditch Assist Quick Start Guides: Get Up and Running with Ease
If you’re looking for fast, practical solutions to set up and use Ditch Assist for precision land management, our quick start guides provide everything you need. These cheat sheets are designed to walk you through the essential steps for installation, setup, and operation, ensuring you’re ready to tackle grading, drainage, and land-forming tasks efficiently.
These are also available in the new Ditch Assist User Guide App via the App Download Page.
You may also download the complete series as a single PDF document from HERE.
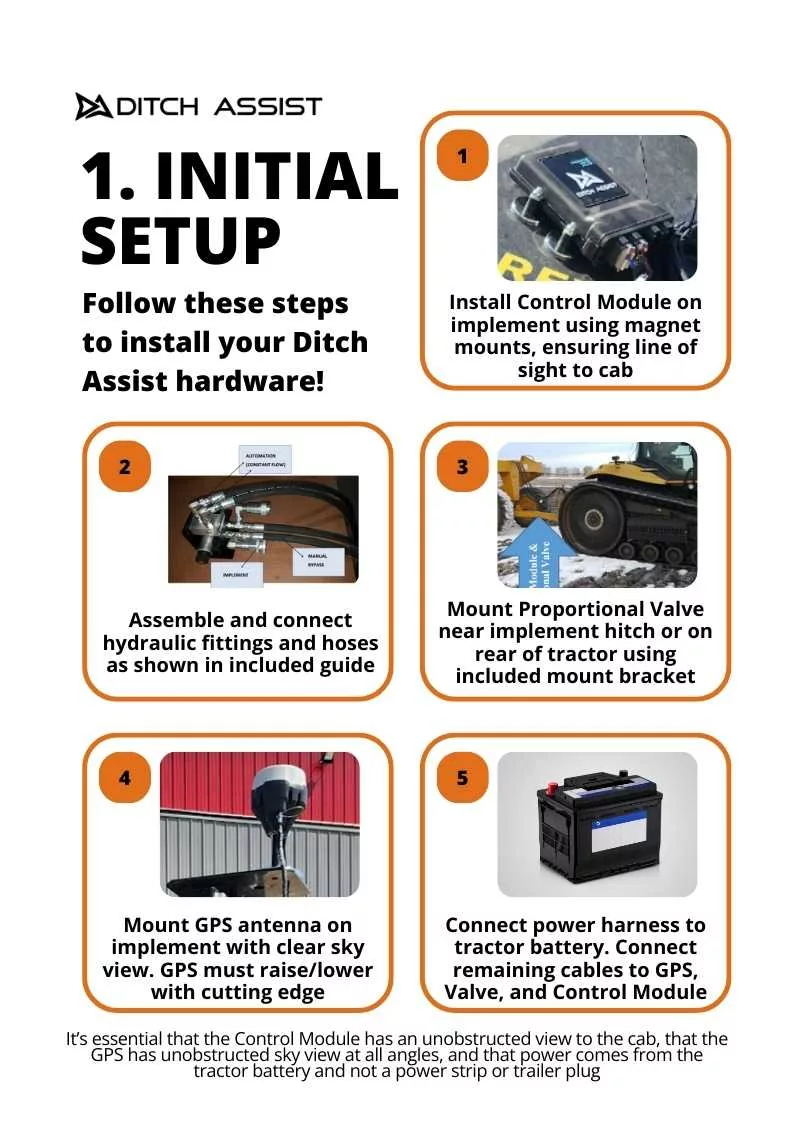
1. Initial Setup Made Simple
Our initial setup guide shows you how to install the Ditch Assist hardware in just a few steps. Attach the control module using the magnet mounts, ensuring a clear line of sight to the cab. Connect the hydraulic hoses, and mount the GPS antenna on the implement for optimal signal reception. Power the system directly through the tractor battery for reliable operation.
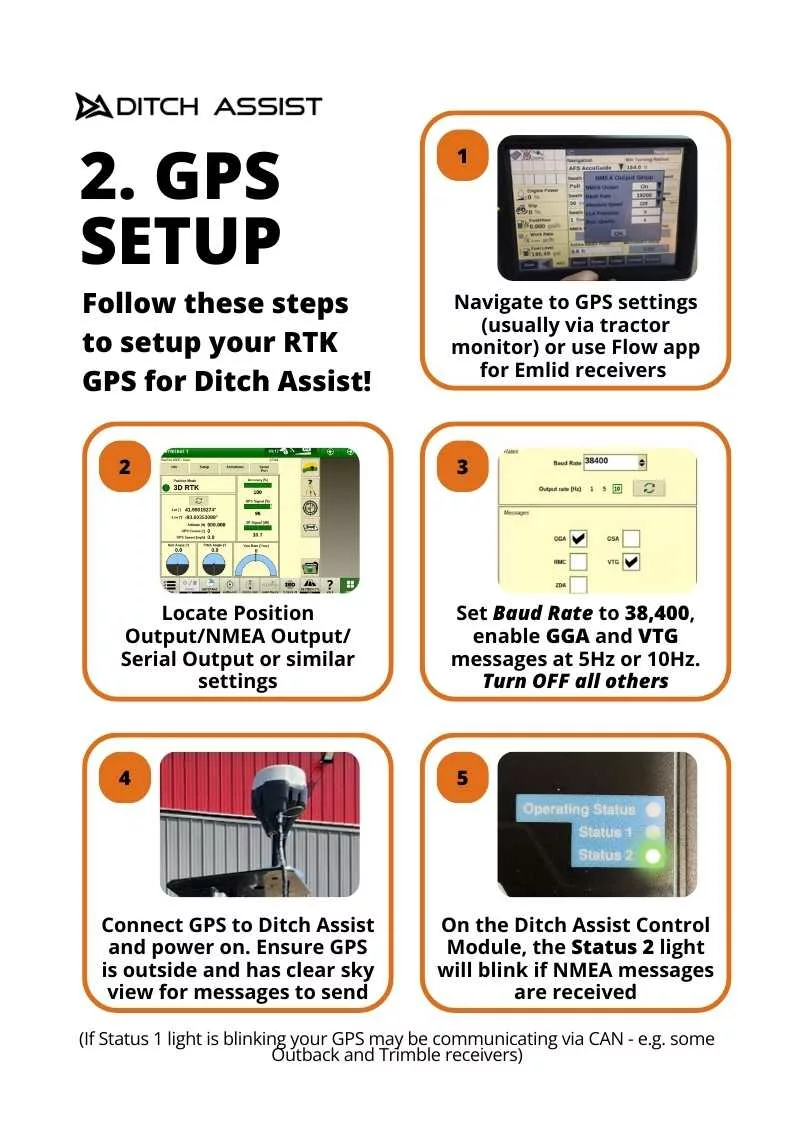
2. RTK GPS Setup Cheat Sheet
Precise elevation control is key to effective drainage and grading. Our GPS setup guide helps you configure RTK settings quickly. Ensure proper NMEA output and set the baud rate to 38,400. For the best results, activate only GGA and VTG messages, and turn off other unnecessary outputs. You’ll be ready to use accurate GPS data in no time.
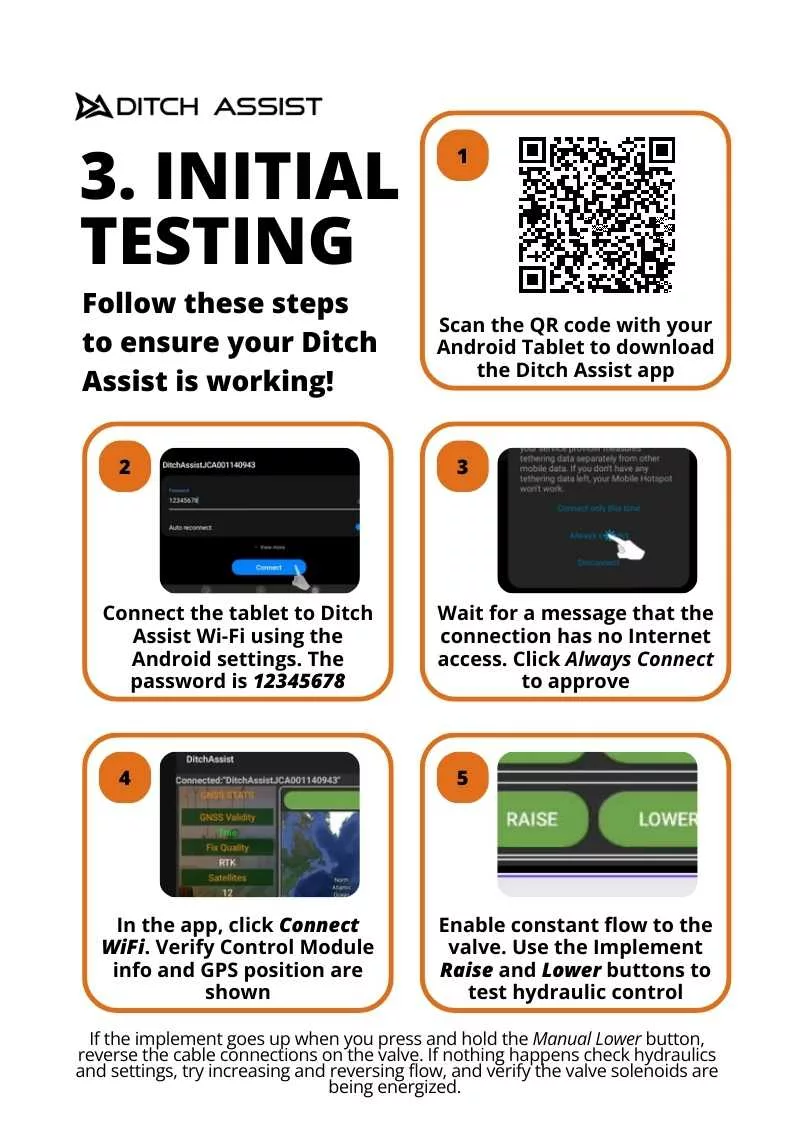
3. Initial Testing Before the Field
Before getting to work, perform an initial test to ensure the system is functioning properly. Connect your Android tablet to Ditch Assist via Wi-Fi and use the app to control the hydraulic system. By testing the Raise and Lower buttons, you can confirm that all hydraulics are correctly configured.
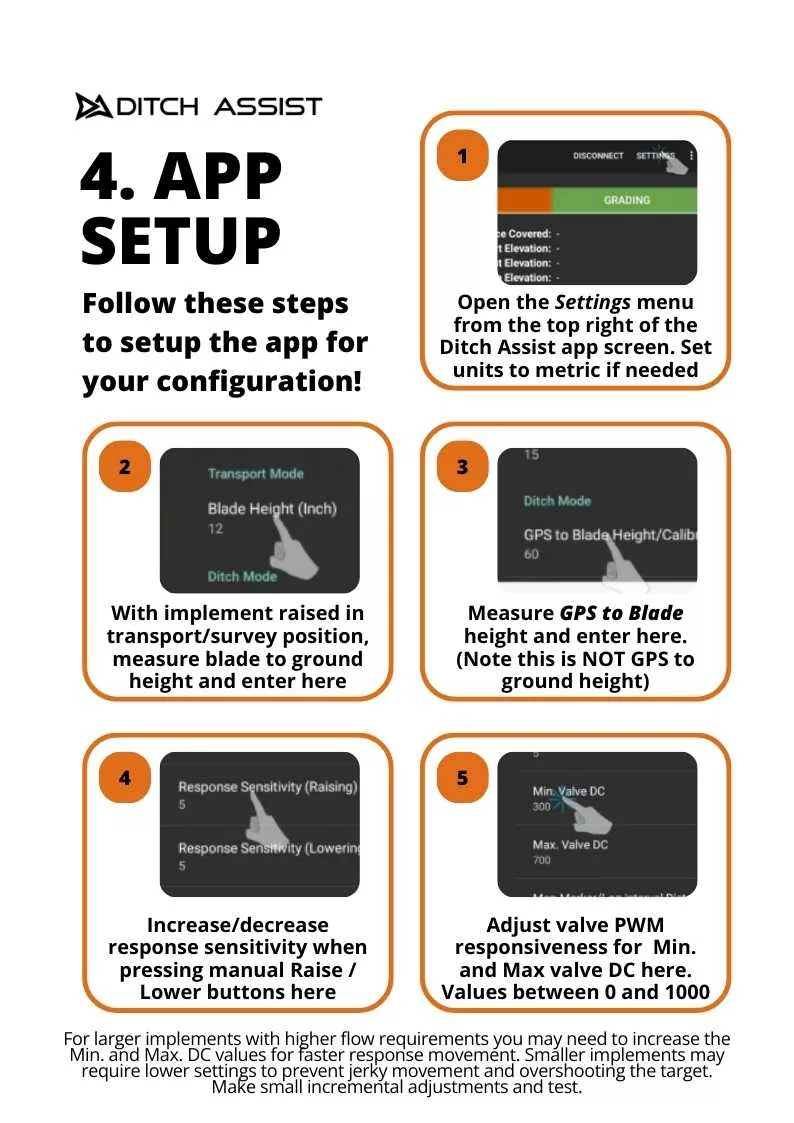
4. App Setup for Quick Adjustments
Setting up the Ditch Assist app is straightforward with our quick start guide. You can quickly adjust units, enter blade height, and fine-tune response sensitivity for optimal performance. Whether you’re controlling large or small implements, the app allows for easy configuration to match your specific requirements.
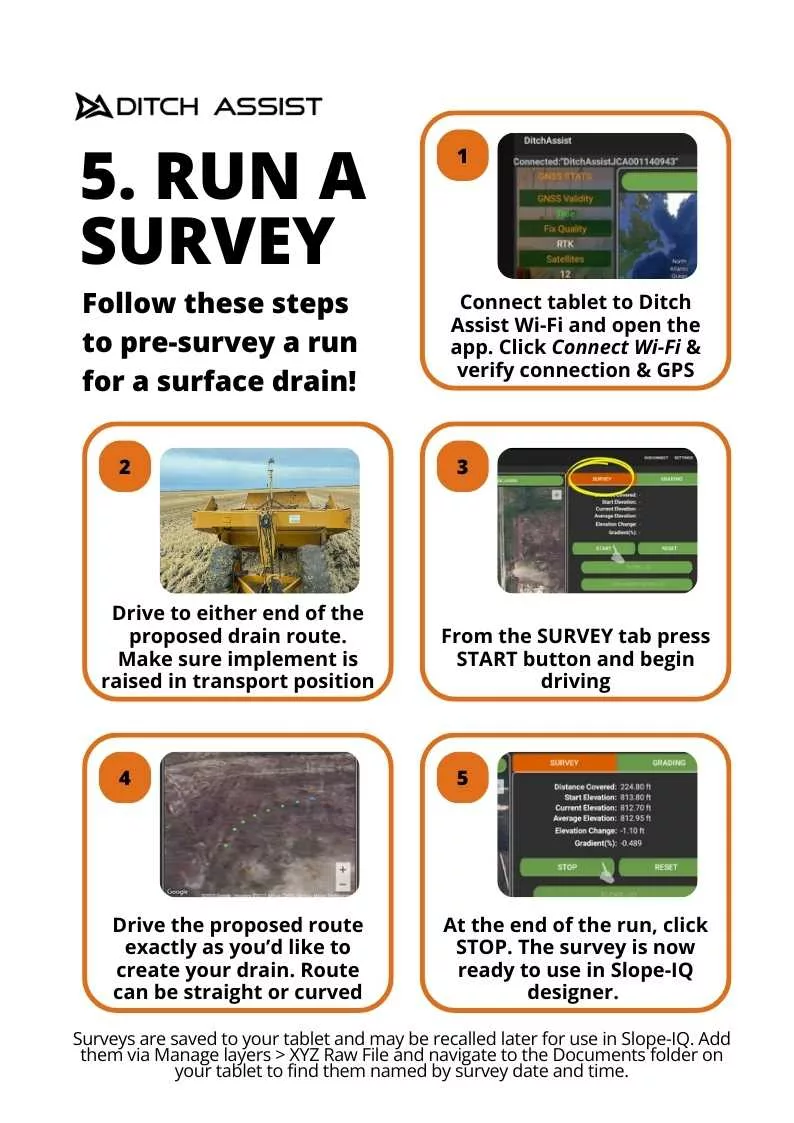
5. Run a Survey for Surface Drainage
Ditch Assist makes it easy to survey a run for surface drainage. Use our cheat sheet to connect your tablet to the Ditch Assist Wi-Fi and survey your route. With just a few taps, you can save the survey and load it into the Slope-IQ designer for further analysis.
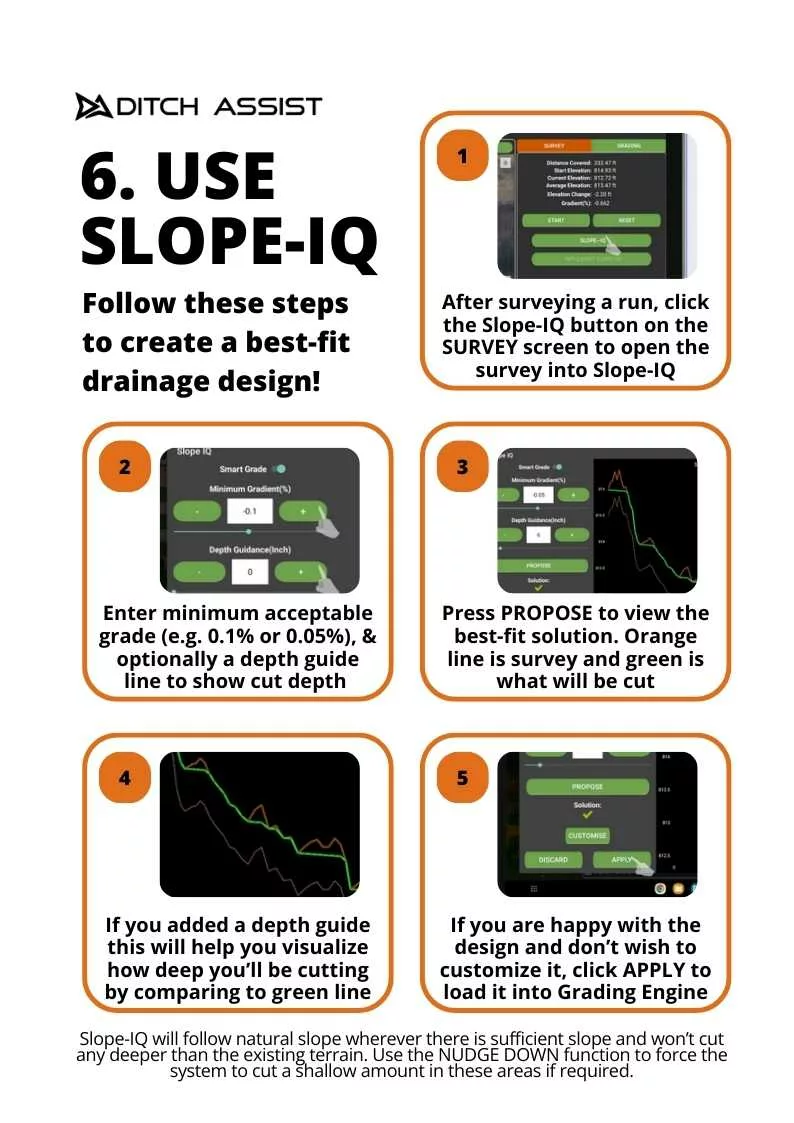
6. Use Slope-IQ to Optimize Drainage Designs
Creating a best-fit drainage design is fast and intuitive with Slope-IQ. Follow the steps in our guide to input your minimum grade and depth, and let Slope-IQ propose the best solution. Visualize your design before applying it to ensure you achieve the perfect slope for drainage.
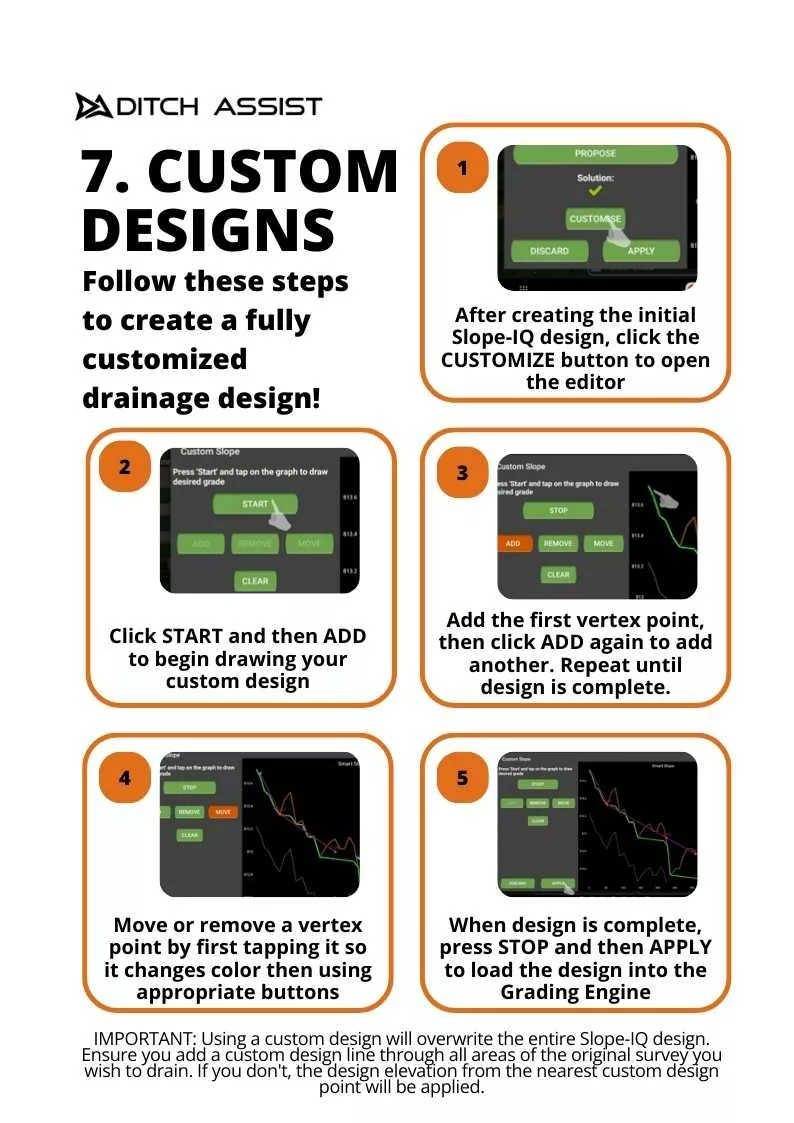
7. Custom Designs for Full Control
For advanced users, our custom design guide lets you take complete control of your drainage planning. Add and adjust vertex points to create a fully customized design that fits the unique needs of your field. You’ll have the flexibility to plan complex grading and drainage systems with ease.
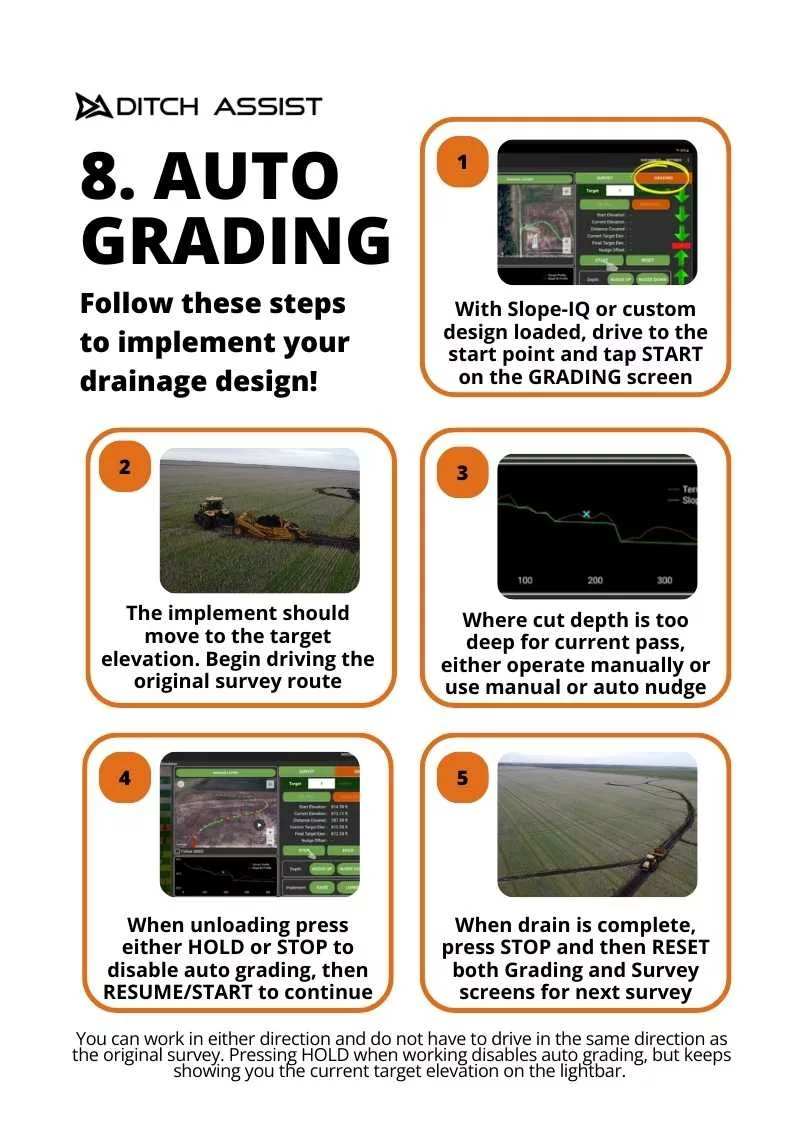
8. Auto Grading with Precision
Once your design is ready, our auto grading cheat sheet helps you implement it. Start by loading your design into the Grading screen, and let Ditch Assist guide the implement along the desired path. Where cuts are too deep for a single pass, the system will let you manually nudge or auto-adjust.
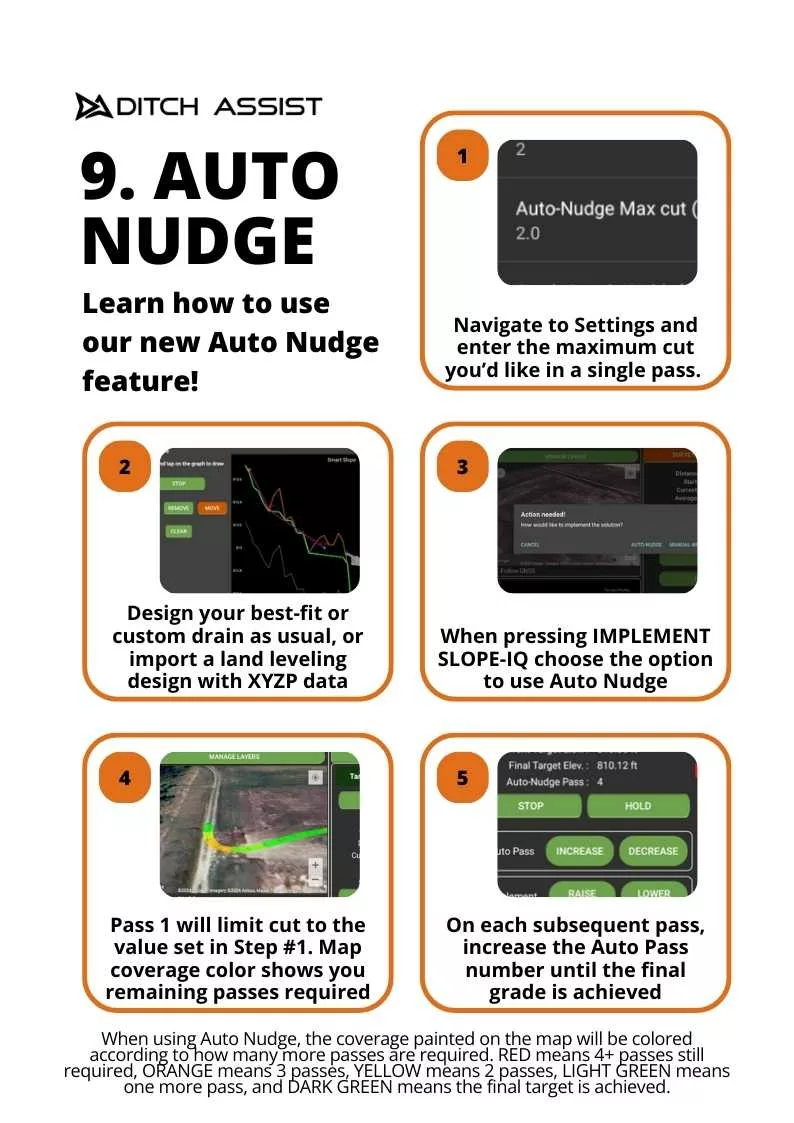
9. Auto Nudge for Multi-Pass Operations
Our Auto Nudge feature simplifies multi-pass grading operations. The quick start guide shows how to set a maximum cut for each pass and monitor the process. The color-coded map provides real-time feedback, helping you track progress and know when your grading is complete.
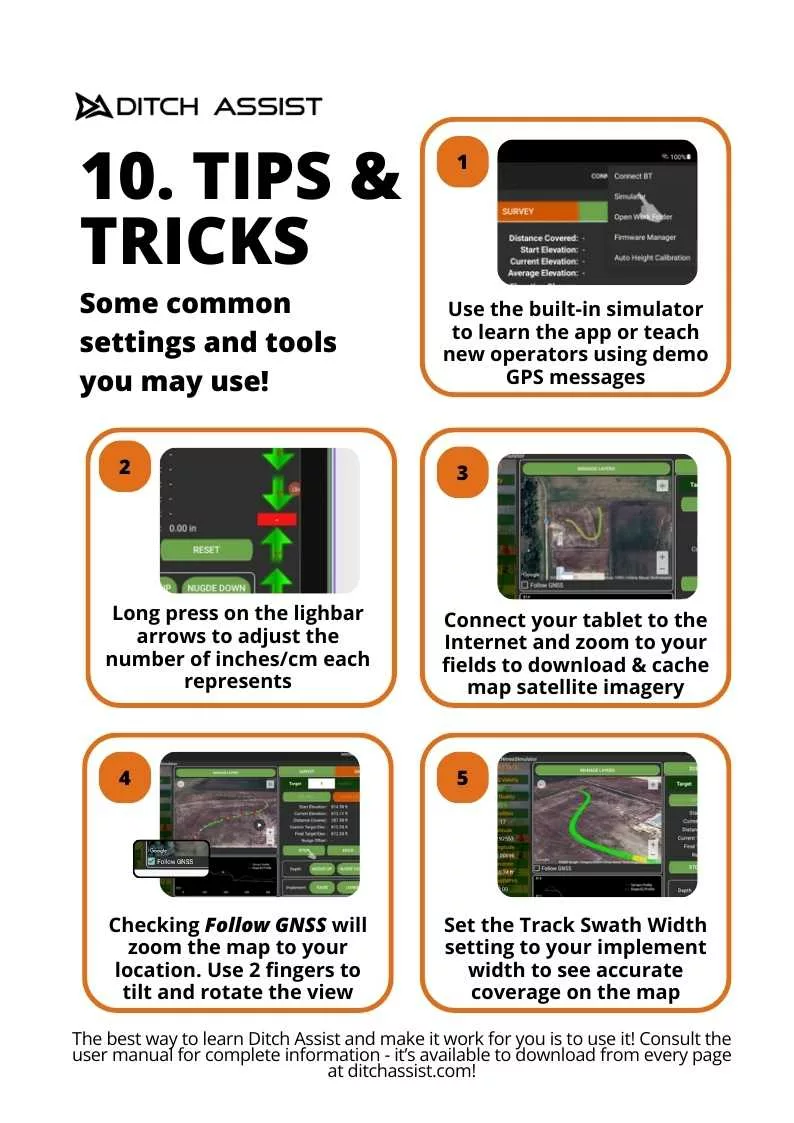
10. Tips and Tricks for Efficient Operation
Make the most of your Ditch Assist system with these essential tips and tricks. Whether you’re using the built-in simulator for training or adjusting lightbar settings, our cheat sheet provides practical advice for getting the best results every time.
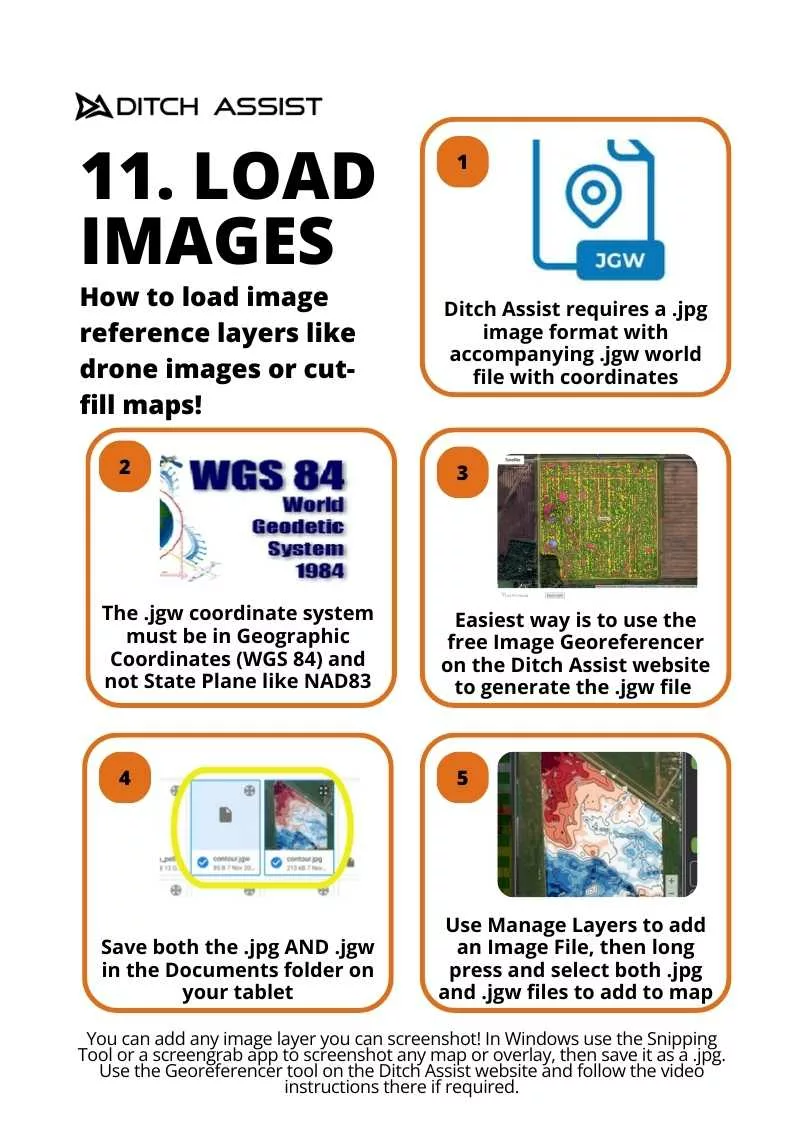
11. Load Images for Reference Layers
Need to load drone images or cut-fill maps? Our guide on loading image layers in Ditch Assist simplifies the process. The system requires a .jpg image and an accompanying .jgw file with geographic coordinates. Ensure your coordinates are set in WGS 84, not State Plane. Use the free Image Georeferencer tool on the Ditch Assist website to generate the .jgw file. Once your files are ready, save both the .jpg and .jgw in your tablet’s Documents folder, and then add them via the Manage Layers tool.
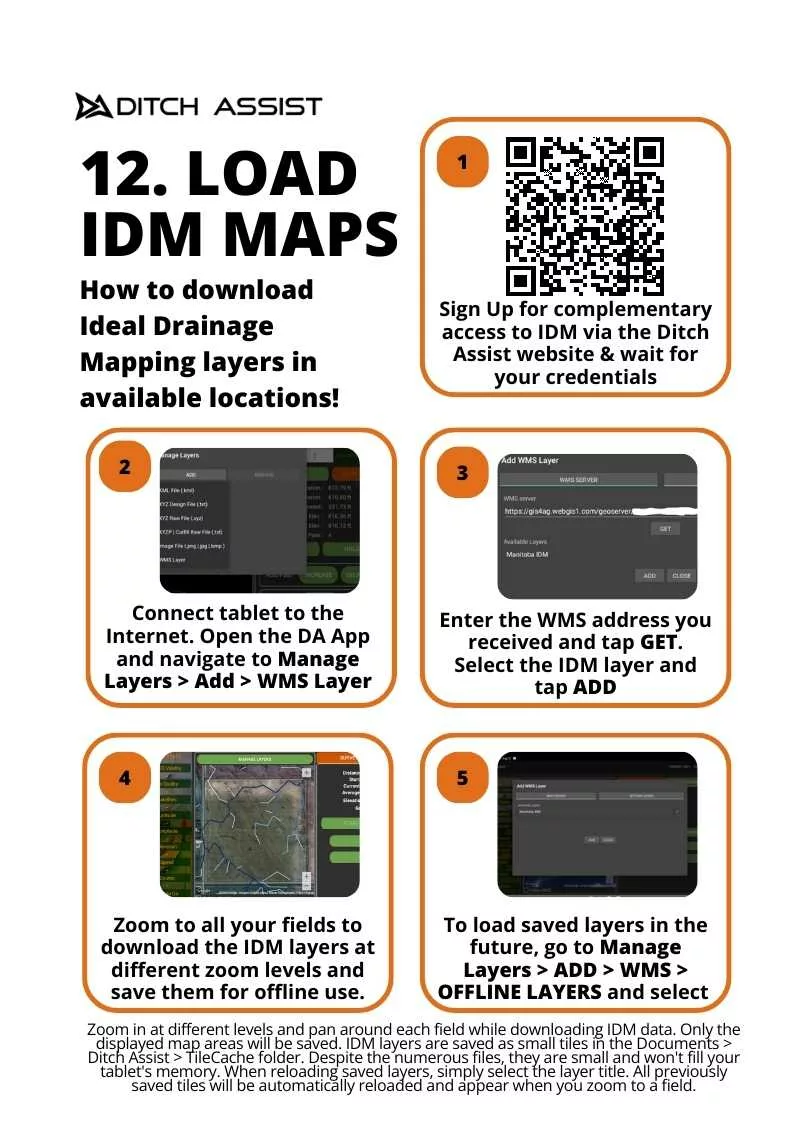
12. Load IDM Maps for Ideal Drainage
Ditch Assist’s Ideal Drainage Mapping (IDM) layers are now easier to access! Sign up for complementary access to IDM, and once you have your credentials, you can load the maps directly into your app. Our quick guide shows you how to add WMS layers and save them for offline use. Once added, you can zoom in and pan across your fields at different levels to download map areas that will be saved for future access.
13. Simple Grading for Fast Results
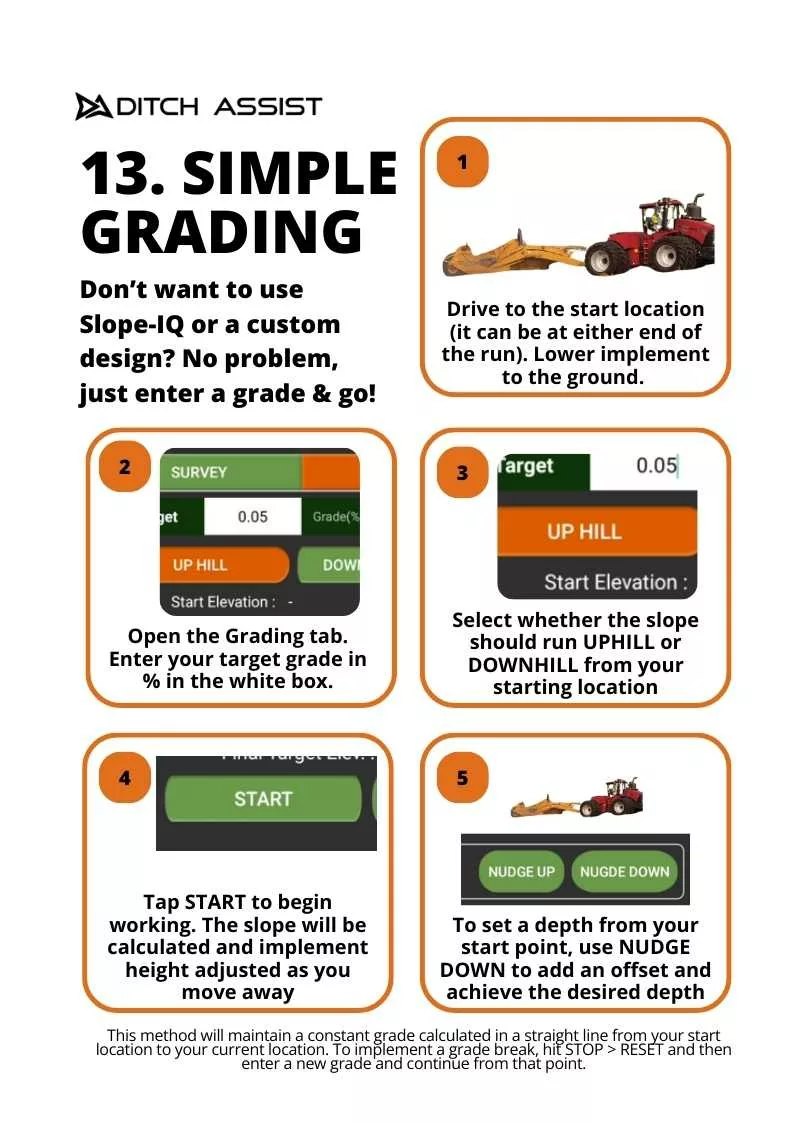
Not interested in creating a custom design or using Slope-IQ? No problem—simple grading lets you enter a target grade and get started right away. After entering your target percentage, select whether the slope should run uphill or downhill and start working. If you need to adjust depth as you work, use the Nudge feature to fine-tune your settings on the fly. This is the fastest way to get effective grading done without complex designs.
14. Simple Leveling for Flat Planes
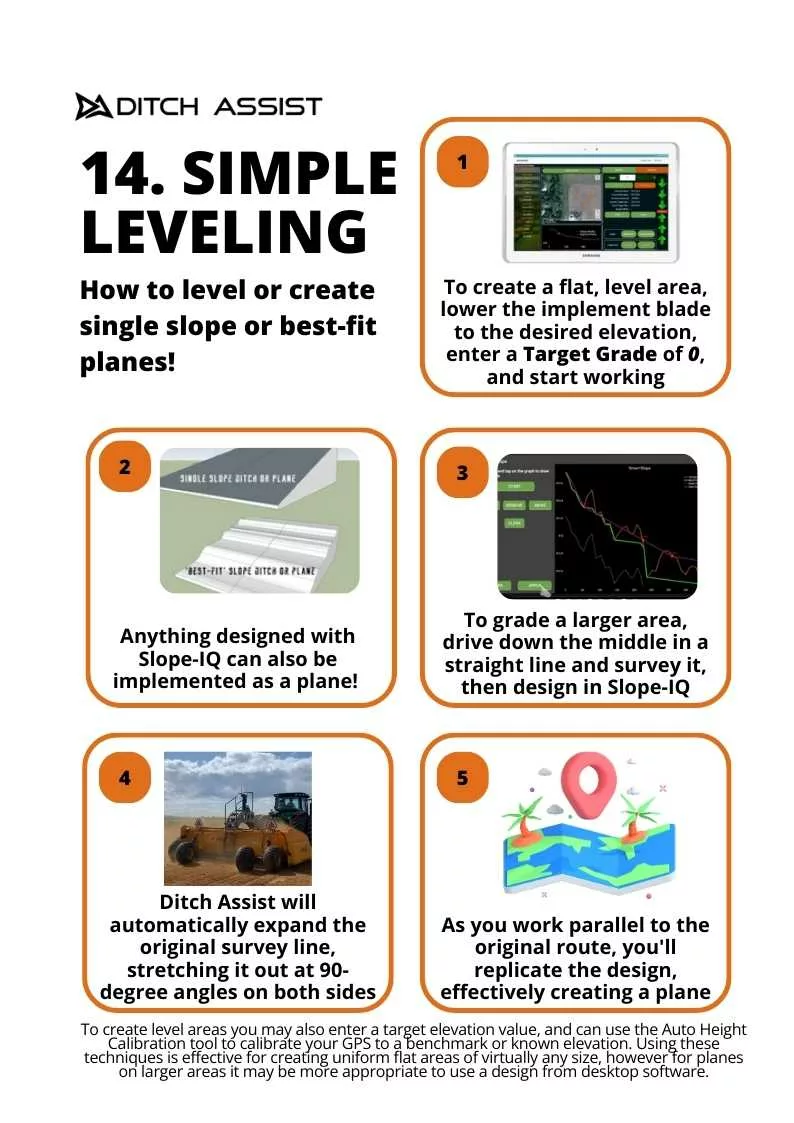
Creating a flat, level area or a simple slope is easy with Ditch Assist. Enter a target grade of 0 and start grading to form a flat surface. For larger areas, survey a central route and use Slope-IQ to design the best-fit plane. As you work parallel to the original route, Ditch Assist will automatically expand the area, creating uniform leveling across the entire field. This method ensures high precision for flat planes or graded areas.
15. 3D Land Forming for Advanced Designs
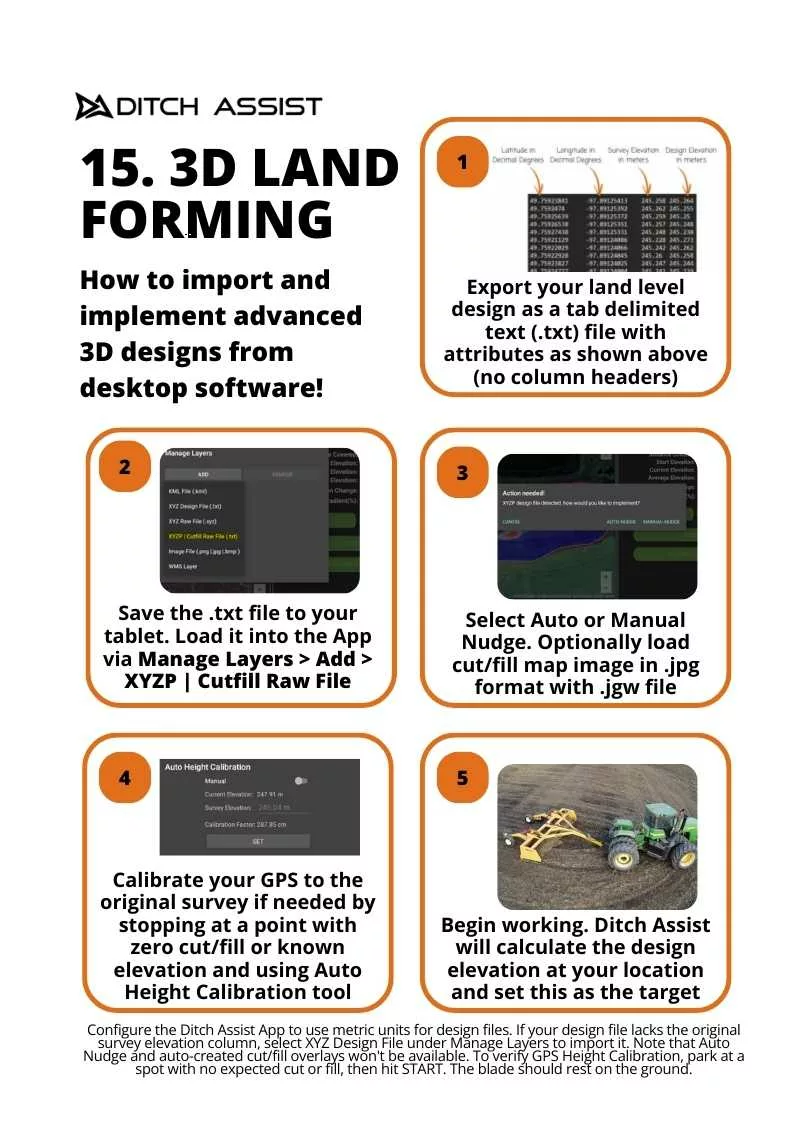
Want to implement advanced 3D designs? Our land forming guide walks you through importing a design from desktop software. Export your land level design as a .txt file with appropriate attributes, and load it into the Ditch Assist app. You can then use Auto or Manual Nudge to adjust your implement’s height based on the design. Ditch Assist will calculate the necessary elevations, making sure your grading follows the design with precision.
16. Tile Drainage Installation
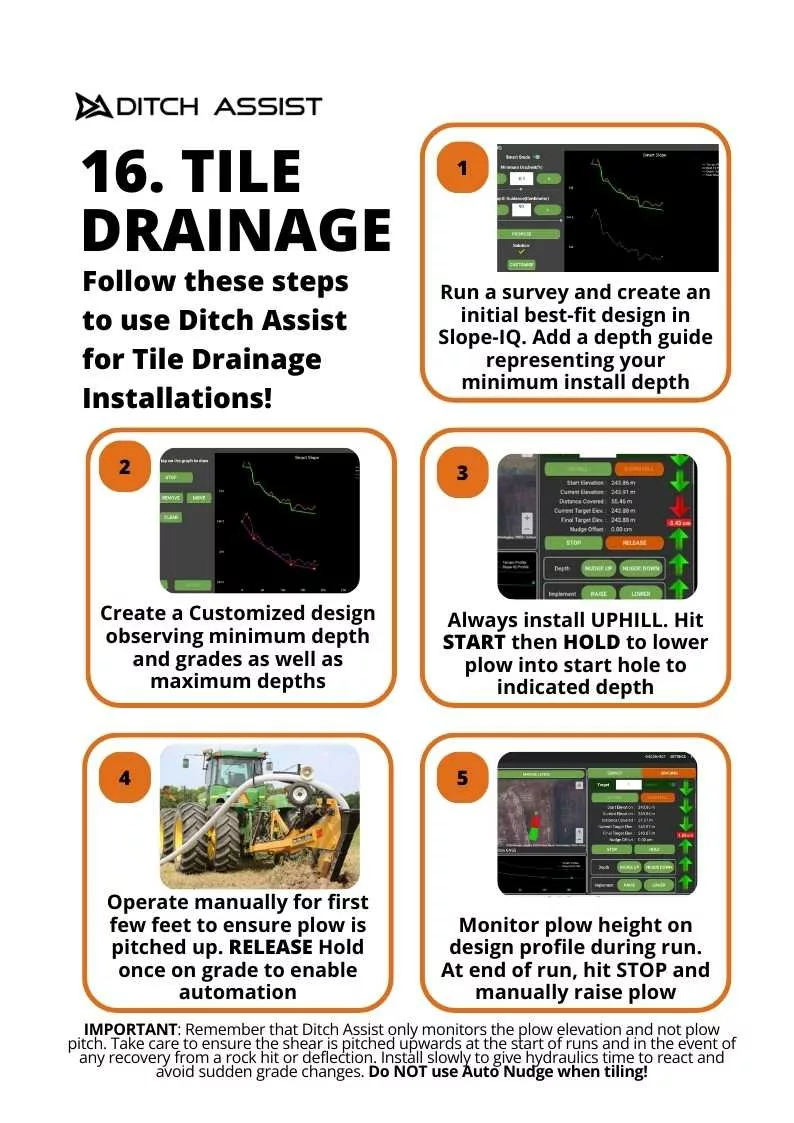
Ditch Assist can also help with tile drainage installations. Follow our guide to create a best-fit design, ensuring proper depth and slope for drainage pipes. Start uphill, use manual control for the first few feet, and then allow the system to take over for automated control of plow height. This method ensures that your tile drains are installed at the correct depth with minimal effort, helping you maintain proper water flow and field drainage for years to come.

